

Level Up Your Testing Game: Harnessing GoMock for Unbeatable Unit Testing in Go

Objective: How to apply GoMock to make unit tests in Golang?
Introduction
In the Go programming language, a popular framework called GoMock provides a powerful solution for mocking dependencies during testing. GoMock simplifies the process of isolating units of code, enabling more focused and effective testing.
In this article, we will explore GoMock and its benefits in Go testing. We'll cover the basics of installation and setup, demonstrate how to create mock objects, and showcase various techniques for setting expectations and behaviors in your tests. By the end, you'll have a solid understanding of how GoMock can enhance your testing workflow and improve code quality.
Why GoMock?
There are some reasons for me to use GoMock to make unit test in Golang:
Thorough Testing: GoMock allows developers to test code extensively by creating mock objects that simulate different scenarios and edge cases. This ensures that the code is rigorously tested and improves the reliability of the software.
Early Bug Detection: GoMock helps identify and fix bugs early in the development process by isolating dependencies and testing individual components independently. It allows for comprehensive testing, including difficult-to-provoke error conditions.
Improved Code Quality: GoMock promotes better code organization by separating concerns and testing components in isolation. It helps identify design flaws and enhances code maintainability and extensibility through refactoring based on test insights.
Utilizing GoMock
To utilize GoMock effectively, developers can make use of the toolset provided by GoMock, which includes a CLI generator and a library for creating and managing mocks:
CLI generator: often referred to as "mockgen," is a command-line tool that automatically generates mock implementations of interfaces based on Go source files.
Library: is the Golang library that developers can import into their test code to create and manage mocks and write test functions.
Step to making unit test
An essential aspect of using GoMock effectively is understanding the abstraction of steps involved in using the framework. The following steps provide a high-level overview of how GoMock is typically utilized:
Identify dependencies: Determine the interfaces and dependencies that need to be mocked in your code.
Generate mocks: Use the mockgen tool to automatically create mock implementations for the identified interfaces.
Implement test cases: Import GoMock and the generated mocks in your test code. Write tests that use these mocks to simulate dependency behavior.
Set expectations: Use GoMock functions to define expected method calls, arguments, and return values for the mocks.
Execute the test: Run your test code to exercise the code under test along with the mock objects.
Verify expectations: Use GoMock functions to check if the expected method calls were made to the mocks in the correct order.
Installation and Setup
Before we can start using GoMock for testing in Go, we need to ensure that it is properly installed and set up in our development environment.
Step 1: Install GoMock
GoMock is a Go module and can be installed using the standard go get command. Open your terminal or command prompt and execute the following command:
go get github.com/golang/mock/gomock
This command downloads the GoMock package and its dependencies from the official GitHub repository and installs it in your Go workspace.
Step 2: Install the Mockgen tool
GoMock relies on the mockgen tool to generate mock implementations from interfaces. To install mockgen, execute the following command:
go install github.com/golang/mock/mockgen@latest
This command fetches the latest version of mockgen and installs it in your Go bin directory.
Step 3: Set up your project
To use GoMock in your project, you need to import the necessary packages. In your Go source code file, include the following import statements:
import (
    "testing"

    "github.com/golang/mock/gomock"
)
The testing package is Go's built-in testing package, and gomock provides the functionalities of GoMock.
Step 4: Generate mocks
Before we can start using GoMock, we need to generate mock implementations for our interfaces. To do this, we'll use the mockgen tool we installed earlier.
mockgen -source main.go -destination mocks/mocks.go
The command is used to generate mock implementations for interfaces defined in the main.go file and save the generated mocks in the mocks/mocks.go file.
Let's break down the different components of the command:
mockgen: This is the command-line tool provided by GoMock that generates mock implementations based on the provided source file and interface declarations.source main.go: This flag specifies the source file from which the tool should extract the interface declarations. In this case, the source file ismain.go. You can replacemain.gowith the path to your Go source file containing the interfaces you want to mock.destination mocks/mocks.go: This flag indicates the destination file where the generated mocks will be saved. In this case, the destination file ismocks/mocks.go. You can choose any desired path and filename for your mock implementation file.
When you execute this command, GoMock will analyze the main.go file, identify the interfaces defined within it, and generate corresponding mock implementations. The generated mocks will be saved in the specified destination file (mocks/mocks.go in this case).
Once the mocks are generated, you can import the mocks/mocks.go file into your test files and use the generated mock implementations to simulate the behavior of the actual interfaces during testing.
It's important to note that you should replace main.go with the appropriate path to your Go source file, and mocks/mocks.go with the desired path and filename for your mock implementation file based on your project structure and naming conventions.
Step 5: Start testing with GoMock
With GoMock installed and mock implementations generated, you are now ready to start testing your Go code. You can import the generated mock and use it in your test files to simulate dependencies and define expectations.
import (
    "testing"

    "github.com/golang/mock/gomock"
    "github.com/your-module-path/mocks"
)
Now you can create instances of the mock object and utilize its methods within your test cases.
GoMock in practise
Problem
As a user, I need a function to login into the system. The function should be interact with database to checking existence of user in the DB with given email and password.
First, let’s talk about the source code. This is the directory tree graph for the source code:
├── go.mod
├── go.sum
├── main.go
├── models
│   └── user.go
└── store
    └── user.go
Note: You can find the code in the Github HERE !!!
In the source, models package contains declare of all models in the system and store package includes functions that interact with the database. In the controller package, we import the above packages to use:
package controller

import (
    "errors"

    "example.com/testing/models"
    "example.com/testing/store"
    "gorm.io/gorm"
)

type Auth struct {
    UserRepository store.UserRepository
}

func (c *Auth) Login(email string, pass string) (*models.User, error) {
    user, err := c.UserRepository.GetUser(email, pass)
    if err != nil {
        if err.Error() == gorm.ErrRecordNotFound.Error() {
            return nil, errors.New("invalid email or password")
        }

        return nil, err
    }

    return user, nil
}
This code defines and Auth interface that implements a function call Login(). In the Login() function we simplify by just calling the GetUser() function to check whether user exist in the DB or not. Then, it will return User model or error based on the response.
Steps to make unit test with GoMock
Creating A Mock Object
To create Mock Object from the interface in the file main.go we use command:
$ mockgen -source store/user.go -destination mocks/mocks.go
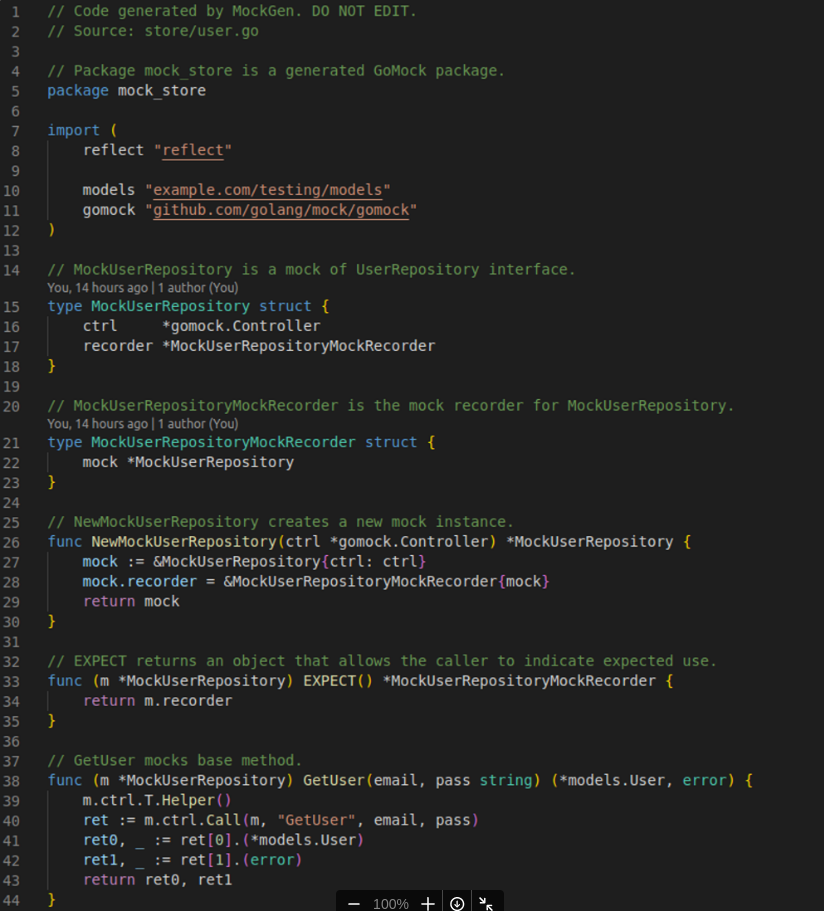
After generating the mocks/mocks.go file, you will notice that it contains several structs. You don't need to understand all the code, but here are the structs that are created in the mocks/mocks.go file in the repository.
Writing test
mockCtrl := gomock.NewController(t)
mockUserRepository := mock_controller.NewMockUserRepository(mockCtrl)
testAuthController := &controller.Auth{UserRepository: mockUserRepository}

defer mockCtrl.Finish()
The defer mockCtrl.Finish() method is deferred to ensure that it is called at the end of the test execution. It tells the gomock.Controller that all expected calls on the mock objects have been specified, and any unfulfilled expectations should result in test failures. It is important to call Finish to clean up the resources held by the controller after the test finishes.
The next step is define the behavior of the Mock Object before writing the tests for the UserClient’s GetUser() function. Although GoMock and mockgen are smart, they can’t analyze your code to generate responses. This is why you should analyze your code as part of your test. Do this using the EXPECT() function:
mockUserRepository.EXPECT().GetUser(tt.args.email, tt.args.pass).Return(tt.want, tt.wantRepositoryError).Times(1)

user, err := testAuthController.Login(tt.args.email, tt.args.pass)
In this code snippet, the EXPECT() call is immediately followed by the .GetUser() call, where you define the parameters that the mock implementation of the UserClient’s GetUser() function should accept. Your test will fail if any of the test code makes calls to the GetUser() function that does not match the parameters you've defined.
To avoid hardcoding, you can replace parameters with gomock.Any(). However, where possible, use specific parameters to make your tests less ambiguous.
The last two functions, Return(tt.want, tt.wantRepositoryError) and Times(1), define that a call to GetUser(tt.args.email, tt.args.pass) should return (tt.want, tt.wantRepositoryError). However, the call must be used once during the mock object's lifetime. Use AnyTimes() to avoid specifying the number of times you call a function, although this should be avoided when possible to reduce ambiguity. Now that the mock object is fully configured, you can start writing your test.
Then we can make the struct input for testing and test the output.
Note: You can find full test file here
Verify test
Now, verify that both tests are working as expected by running:
$ go test
PASS
ok      example.com/testing     0.001s
This is a simple example of how to use GoMock in your tests. With GoMock we can implement testing without needing the real repository. Mock object could be use to replace the real one isolating dependencies and making the testing process easier.
Note: The official GoMock README is a great place to get started if you want to learn more.
Conclusion
In conclusion, this article explores GoMock, a widely used Go framework designed to facilitate the mocking of dependencies during testing. By allowing developers to isolate units of code and conduct focused and effective testing, GoMock offers numerous benefits. It enables the creation of mock objects for interfaces, facilitates the simulation of diverse scenarios and responses from dependencies, and seamlessly integrates with the Go testing framework. The article provides a comprehensive overview of GoMock, including instructions for installation and setup, demonstrations on creating mock objects, and showcases various techniques for defining expectations and behaviors in tests. Furthermore, the article also acknowledges and discusses the limitations of GoMock.
Contributing
At Dwarves, we encourage our people to read, write, share what we learn with others, and contributing to the Brainery is an important part of our learning culture. For visitors, you are welcome to read them, contribute to them, and suggest additions. We maintain a monthly pool of $1500 to reward contributors who support our journey of lifelong growth in knowledge and network.
Love what we are doing?
Check out our products
Hire us to build your software
Join us, we are also hiring
Visit our Discord Learning Site
Visit our GitHub
References
https://speedscale.com/blog/getting-started-gomock/
https://betterprogramming.pub/a-gomock-quick-start-guide-71bee4b3a6f1
You can find the full source code in this example repo:


